 home page") Identifying Chord Bars From Your 21-Chorder |
| 

Editor's Note: We still have some tweaking to do on this article, but we're publishing it now because the question keeps coming up. Please contact us if anything in this article is unclear. We'll try to help you out and also try to sort out whatever bit confused you.
| Identifying Chord Bars From Your 21-ChorderOne advantage of Oscar Schmidt's 21-chord autoharps is that the chord bars are easy to swap around.One disadvantage of Oscar Schmidt's 21-chord autoharps is that the chord bar buttons aren't attached to the chord bars. So the chord bars are easy to mix up.
While I am not a huge fan of Oscar Schmidt's factory setup, I recognize your frustration when you just want to get things back to the way they were, and the factory that made your autoharp under the Oscar Schmidt name didn't bother to do the one thing that would vastly simplify the task - labeling the chord bars. If nothing else, now you know why I say never to open the chord bar cover on a 21-chord Oscar Schmidt without a fine-tipped felt marker on hand. A few Oscar Schmidt autoharps have the chord bars numbered, which is a help. But even if that's the case, I recommend writing the name of the chord on each chord bar you remove. Future you will be glad you did.
The picture to the right shows the chord buttons in the arrangement that 99% of Oscar Schmidt 21-chorders use.
| ||||||||||||||||||||||||||||||||||||||||||||||||||||||||||||||||||||||||||||||||||||||||||||||||||||||||||||||||||||||||||||||||||||||||||||

 |
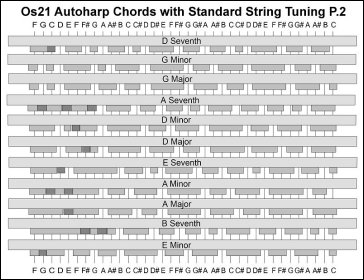 |
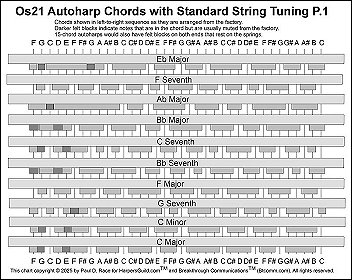
On an Oscar Schmidt autoharp, chords are made by using blocks of felt to deaden all of the strings that are not in the chord. The places where there are not blocks of felt are the places that allow the strings to ring freely. So the gray blocks in my illustrations show the felt blocks that deaden the unwanted strings. They come glued onto the chord bars from the factory.
When you hold your chord bar up against the chart, make certain that it is turned the right way. The end with the slot should be toward the left and the end with the hole should be toward the right.
Note:The dark gray blocks in the illustration show low notes that are technically part of the chord, but which are usually deadened because they actually make the chord sound worse if they're included. I showed them this way because you'll occasionally come across an autoharp on which they have been cut out. in 99% of cases, you should assume that the areas shown by the dark gray blocks are also deadened.
I would recommend trying to find the F, C, G, and D chords first (including F7, C7, Cm, G7, Gm, D7, and Dm) Those chord bars are set up so that the root note of the chord is the lowest open note on the chord bar. Don't mark them yet, though.
Eb and Ab are relatively easy, too, because there are (usually) no open slots at all on the left end of the chord bar. Again, don't mark them yet.
Listening and Looking Closely - When you think you have a chord bar identified, put it temporarily on the lowest (or right-most) teeth of the comb. Press it down so that the felt blocks deaden most of the strings. Then strum the strings. If it doesn't sound like a chord, make certain you have the chord bar turned the correct way (with the slot closest to your belly or chest in playing conditon). If it still sounds bad, look for signs that a felt has come off (There's usually a little glue left where it did.)
If all is well. look at the strings that are open. Some of the strings may be labeled a little oddly. For example, Bb is usually labeled "A#", Eb is usually labeled "D#", and Ab is often labeled "G#). We put the alternate names in the chart below to help you avoid too much confuseion..
Also, the open strings won't always be in the same order as the note names in the chart below. For example a Bb chord (Bb, D, F) will usually have an F below the first Bb. After that, the sequence Bb, D, F will repeat at you go toward the higher strings.
In the chart below, I start with F and work my way toward the "right end" of the chord bars, because having an opening near the left end of the chord bar makes F, C, G, and D chords easier to find first. Once again, the sequence in which they go on your autoharp is shown in the pictures above.
(In standard 21-chord setup) | ||
When you're sure you have the right chord bar, mark the name of the chord on the side with a fine-tipped felt pen.
If you plan to keep the standard 21-chord setup indefinitely, you may mark the chord bar # as well.
Reassembly
Make certain that there is a spring on every "tooth" of both combs. Then begin laying the chord bars out in order, as shown in the "Chord Bar Sequence" illustration above (Eb, F7, Ab, Bb, C7, Bb7, etc.).Being anal-retentive, I always press each chord bar down and strum the strings just to be certain they're sorted and working correctly.
When all of the chord bars are in place, sort out the buttons and put them in three rows as shown in the "Chord Bar Sequence" illustarion above.
Hold the chord bar cover over the buttons, to see how you will need to slide them up or down them to fit properly.
When the buttons are all directly beneath the appropriate holes in the chord bar cover, set it down over them gently. You will heed to "nudge" several of them "north or south" to get the where they belong. Some folks claim that they can do it with the erasers on pencils. I've been known to use micro screwdrivers or the like.
Compare your chord bar button layout to the "Chord Bar Sequence" illustration to make certain you have the buttons in the right place. (If you don't, you may also need to make certain you have your chord bars in the right places.)
Press each chord bar and strum to be certain the buttons are comming up and down as they should. Adjust as necessary (on one 21-chorder that had been dropped, I had to file the hole for one of the buttons to keep it from binding uip against the inside edge of the hole. You shouldn't have to do this, but the point is that every button should be coming up and down properly and making the right chord sound when it does.)
Find the four little screws that hold the chord bar cover on and screw it down. Test every chord bar again to make certin nothing is binding.
Conclusion
Though this seems like a massive project, you soon realize that it's mostly repetition of the same simple tasks over and over.Chances are you've also figured out why autoharpers who've done maintenance on their autoharps are more likely to rearrange or doctor their chord bars than folks who haven't.
Please contact us if anything in this article is unclear. We'll try to help you out and also try to sort out whatever bit confused you.
Other Articles and Resources
Current autoharp repair resources we offer include:- Replacing Autoharp Strings
- Replacing Loose Felt on an Autoharp
- Cleaning Dusty Autoharps Video - For when everything works fine but you need to clean off surface dust.
- Standard Autoharp Chord Bars - A reference for folks refelting or reconfiguring their autoharps.
- Autoharp Factory Chord Setups - A reference for folks trying to rebuild specific instruments.
Third-Party Resources:
- D'Aigle's "How-To" Corner - Daigleharp.com's list of articles and videos to help you with common issues and tasks.
- Autoharp Chordbar (OS21) Secrets for the Bold and Crafty! - From Hal Weeks. A nice overview of the way the chord bars attach and work on an Oscar Schmidt 21-chorder.
- Cutting Autoharp Felt: and some things that can go wrong! - from Hal Weeks.
- How to Re-Felt Your Autoharp Chord Bars - a video from Pete D'aige.
- How do I know it's time to refelt my autoharp? - from Hal Weeks.
- Anchors Away: Oscar Schmidt design flaw, fix it or lose it. - from Hal Weeks. On Oscar Schmidt 21-chorders, the slotted aluminum bar that holds one end of the string isn't fastened in place. How to keep it from pulling up and causing your 'harp's face to buckle. If you're not familiar with woodworking tools, you might want to get someone who is to help with this project.
- Troubleshooting Autoharp buzzes and odd sounds - from Hal Weeks. Sorting issues caused by missing felts and related issues.
- Autoharp signed by Bryan Bowers! Refurbishing OS Centurion: Shop process video PART 1 - From Hal Weeks. Dealing with issues that affect well-used, solid-topped autoharps that are salvageable.
In addition, our articles on tweaking and reconfiguring autoharps also offer some tips that may help you get through repairs regarding chord bars, springs, etc.
As I have time, I'll write more specifically about these problems and others you may encounter. In the meantime, I hope our available articles help answer your questions about these under-rated instruments.
 Whatever else you get out of our pages, I hope you come away with some great ideas for "sharing the joy."
And please stay in touch!
- Paul Race
![]()
![]()

![]()
![]()
![]()
![]()
All material, illustrations, and content of this web site is copyrighted ? 2001, 2002, 2003, 2004, 2005, 2006, 2007, 2008, 2009,
2010, 2011, 2012, 2013, 2014, 2015, 2016, 2017, 2018, 2019, 2020, 2021, 2022, 2023, 2024, 2025 by Paul D. Race. All rights reserved.
Creek Dont' Rise(tm) is a participant in the Amazon Services LLC Associates Program, an affiliate advertising
program designed to provide a means for sites to earn advertising fees by advertising and linking to Amazon.com.
Note: Creek Don't Rise (tm) is Paul Race's name for his resources supporting the history and music of the North American Heartland as well as additional kinds of acoustic and traditional music.
For questions, comments, suggestions, trouble reports, etc. about this page or this site, please contact us.
| Visit related pages and affiliated sites: | |||||
| - Music - | |||||

|
 |
 |

|

|

|

|

|

|

|

|

|

|

|

|

|

|

|
| - Trains and Hobbies - | |||||
 |

|

|  |
 |

|
| - Christmas Memories and Collectibles - | |||||
 |

|
 |

|

|
|
| - Family Activities and Crafts - | |||||
 |

|

|

|

|

|