 home page") Simplest Folk/Bluegrass Chord Addition for 21-Chorders |
 |
|


| Editor's Note: The standard autoharp's inability to play complex songs in D, A, and E has long kept it from being widely adopted by folks who love traditionally-inspired genres like String-Band, Folk, Bluegrass, and Country. Around 2017, while experimenting with 21-chorders, I realized that you could add the chords you needed for those genres without making major changes. This is especially helpful for owners of Chromaharp 21-chorders, some of which were very nicely made, but which don't have moveable buttons. Since I wrote the original version of this article, I've developed other resources that I wanted to add. At the same time, I've become acquainted with Jo Ann Smith's writings on her preferred ways of reconfiguring 21-chorders. Despite our different rationales for making these tweaks, Jo Ann's approach very closely resembled mine, so I have added some of her suggestions on this page where they are applicable. This article may seem very long, but the first two-thirds mostly discuss the basic principles of the changes we're suggesting. Once you start doing the actual work, you'll realize that - apart from irrational fear that reconfiguring two or more chord bars will "ruin" your autoharp - there's not that much to it. We also try to reduce your chances of unfortunate surprises by explaining (or overexplaining) details, tips, and "gotcha's." Again, once you work through the process, you'll see it's not that hard or complicated. Finally, this is structured so that you can make these tweaks in two stages. The first stage changes only two or three chord bars, which may be all you need for your favorite traditional songs. The second stage builds on that, so the initial work you did lays the foundation for the "next steps." Please contact us if you have any questions or corrections, or if you find anything confusing. In the meantime - best of luck! - Paul Race Simplest Folk/Bluegrass Chord Addition for 21-ChordersMany, autoharp owners eventually decide that they need chords their autoharps don't have and that they don't need chords that they have. They wind up "swapping" chords. For example, they might sacrifice Ab and Bb7 so they can fit in E major and B minor. But a certain amount of "shuffling" is going to occur, since putting, say, an E major where the Ab used to be won't really be much help. Radical Reconfiguration? - Some folks swap everything around while they're doing this change. (One of the most common is sometimes called a "Bowers" configuration. Click here if you want to check that out.). Simplest Possible Reconfiguration (This Page) - You can get additional chords you need while still keeping your chord buttons in the same relative position you're used to. This approach is especially useful if:
We call this reconfiguration "simple," because most of the chord bars are simply moved over. Yes, you will have to notch some felt strips, but that's not hard, once you get the hang of it. Variation 1Our first example is just to "get your feet wet." It gives you Bm and F#m, two chords you need for complex songs in the key of D, and for many songs in the key of A. It also keeps the relationships between the top two rows the same as you're used to.
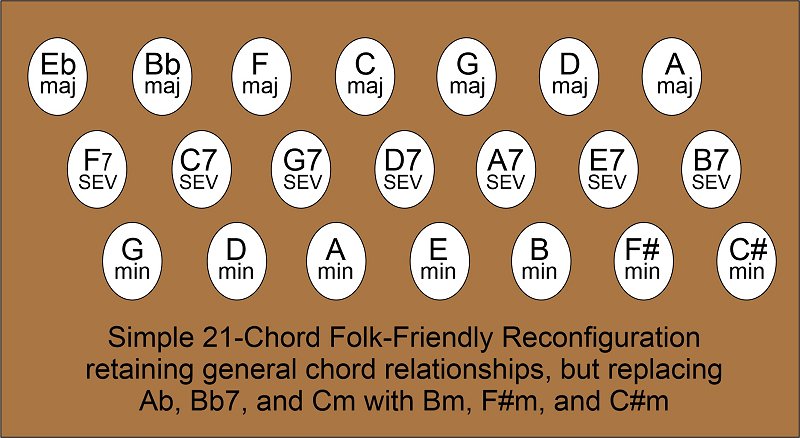
In addition, this change makes the minor chords easier to reach for most songs that use them. For example, songs in the key of C often use Am, songs in the key of G often use Em, and so on. The factory setup actually makes them hard to reach when you're playing the songs that need them the most. Moving the minor chords over a little makes it easier to play in the keys your autoharp supports. This is only one example, of course. Everything on this page is just suggestions (and we have links to more suggestions below.) As the drawing to the right shows, after removing the chord bar cover(s), you remove the Ab, and Bb7 chord bars, lifting them slowly and making certain that the springs stay in place. (If you have an Oscar Schmidt, you should label each chord bar you move by writing on the side with a fine-tipped marker, so they don't get mixed up later. This isn't necessary on a Chromaharp). Then you refelt the chord bars you removed to be Bm, and F#m, using the instructions and templates provided below. Then scootch the chord bars for the bottom row over so that the row starts with Cm respectively. Moving the chord bars over actually involves playing "leap frog." Each chord bar you move has to "jump" over two chord bars as it moves toward the left. To Cm or Not Cm? - The first approach described in the illustration retains Cm, a chord I personally use as a Folk singer. However, not everybody uses Cm on a regular basis. Accomplished autoharp performer and teacher Jo Ann Smith suggests taking things one step further, replacing C minor with C# minor. This creates what she calls "Unified Chord Bars." It makes the minor chords that remain even easier to reach. Many people find this valuable, even if they never actually use the C#m. This configuration also allows you to play complex songs in A, a popular key in several traditional genres. If you take the first tack, your updated 21-chorder should have the key layout shown below left. If you take the second tack, your updated 21-chorder should have the key layout shown below right.
After testing, you replace the chord bar cover(s) and get used to the new setup.
But What About E?If you need E major more than you need C#m, you could follow the second tack above and just put E major where we show the C#m.But that's a little awkward. A more elegant solution - if you don't need to play in the key of Bb - would be to remove Eb in the top row, refelt the chord bar for E major, and skootch the other chords over. Then, you'd put your new E major chord bar next to A major. But that would upset the relationship between the top two rows. And, if you're never going to play in Bb, that F7 chord bar is pretty useless. So many people who adjust the top row that way also adjust the middle row, by refelting F7 as F#7 and skootching the other chord bars in the middle row over. These changes make it possible to play most complex songs in E as well. Again, you may never use F#7 (or even C#), but having the chord bar relationships make sense is invalueable to future playing.
Note: if you wanted to stay with Jo Ann Smith's " Unified Chord Bar" recommendation, you could remove Gm from the bottom row, skootch the other chord bars over, and put G#m on the other end. This would give you the ability to play most complex songs in E. Again, all of these potential reconfigurations are simply suggestions. But How Do I Refelt My Chord Bars?The least expensive and most dependable method of replacing unwanted chords with chords you need is to buy new felt and refelt the chord bars you're taking off. The felt for most 21-chorders is the same (3/16"x3/16"). Don't buy the felt for the 15-chorders. You can buy felt in rolls (like that shown to the right) or in strips the length of a chord bar (not shown). Both kinds have stickum on the back for sticking to your chord bars once you've cleaned off the old felts. About Replacement Chord Bars - Oscar Schmidt OnlySome folks get nervous about refelting their chord bars; perhaps being worried that they may really need Ab at some point in the future. If this is a concern, and you're refelting an Oscar Schmidt 21-chorder, you can buy chord bars with the felt already applied. (If you have a Chromaharp, skip this part - replacement chord bars for 21-chord Chromaharps are as rare as hen's teeth.)
Be sure to buy the chord bar blanks for 21-chord Oscar Schmidt autoharps. 15-chord instruments use different chord bars. So do Chromaharp instruments. If you have an older autoharp, you may notice that the new chord bar blanks are 1/16" shorter than the old ones, and are more curved on the ends. They usually fit on the older 'harps, though. Is Your Autoharp Ready?The actual procedure I'm describring is pretty easy, once you get the hang of it. But most newbies to this sort of thing rightfully take a while the first time through. So before you get out the screwdriver, you might want to think about whether your autoharp is solid enough to justify this work. Ironically, having a newer autoharp doesn't necessarily mean you can ignore this section - the factories currently making autoharps are known for skimping on quality control.For example:
Should You Change the Strings? - You may want to change the strings on your autoharp at the same time. If the strings are sounding dull, or you just want to maximize your enjoyment of your autoharp, you may be considering a string change while you're doing the other work. Don't buy Oscar Schmidt strings, though. As of this writing Greg Schreiber makes the best replacement strings for your autoharp. If the wound (fat) strings sound dull and the rest sound good, Greg can even sell you just the wound strings. That said, I've come across 80-year-old autoharps that still sound great, because they've been stored properly. You can always decide on a string upgrade a month or a year from now if you want. Consider Ordering Buttons (OS Only) - At this moment (January, 2026), buttons for Oscar Schmidt E, Bm, and F#m chord bars are available online for a few dollars each. You can sometimes buy blank buttons that you can use for other chords like C#m. Again, the vendors keep shallow stock, so you may find yourself relabeling existing buttons. Chromaharp owners will probably have to relable existing buttons. Yes, it's hard to make them look right, sorry. Disassembling the AutoharpFirst, tune your Autoharp. Then tune it again. Some of the later steps require testing chord bars to make certain they're playing the strings you want and dampening the strings you don't. If your Autoharp is badly out of tune, you can't really be sure.Carefully remove the screws holding down the chord bar cover(s). If you have an OS, lift the chord bar cover very slowly, jiggling it lightly so the buttons don't all come off. You may need to push some of the buttons down as you're working. You need the buttons to stay in place until you're certain the chord bars have been labeled. When you have the cover safely off, look at the way the chord bars sit in place. If you have an Oscar Schmidt, you'll see that each chord bar has a slot on one end and a hole on the other. That's how they need to go back in when you put things back together. Also, on an OS, it's critical to make certain that the name of the chord is written on any chord bar you take out, whether you plan to keep that chord or not. Of course, if you have a Chromaharp, the buttons are attached the the chord bars, so this precaution isn't necessary. When you pull any chord bar out, make certain the springs stay in place. Removing the FeltsIf you are refelting chord bars, you should be able to carve/slice the felt pieces off using a very sharp knife. Either way, you might find it helpful to use GooGone or mineral spirits or the like to get the rest of the glue/goo off the bars.Save at least a few of the felt bits - you never know when you might need to tweak some other chord bar. Replacing the FeltsFolks do this a few different ways.It's best - and easiest - to stick a single felt strip on and then use a razor blade, Xacto knife, or widget to notch where the gaps should be. That reduces the chances of the individual felt blocks falling off in the future. On an OS, if you use felt strips that are as long as the chord bars, you'll need to cut away a bit on each end so the felt on the ends of the chord bar clear the base of the comb when the chord bar is pressed down.
Note: The graphic includes two chord bars, C#m and F#7, that most people don't add to their autoharps. But some folks do, so we're providing them just in case. Fold the printed graphic and hold it over the strings on your autoharp to make certain the distance between the strings is correct. If not, you may need to reprint at 99% or 101% accordingly. Again, string distances on autoharps vary from year to year. Don't feel bad if you have to print the template multiple times. Pull the last two or three chord bars off the autoharp to give you room to test and label your new chord bars. (Make certain they're labeled). Next, label the chord bar you're going to cut next into place on the comb on both ends. (Make certain you put the end with the hole on the correct comb.) Align the folded paper to make certain it aligns with the strings and put a mark each place on the chord bar where you will need a notch. Lay the paper aside. Going by your marks, pluck each string that will be open once you cut the notches. You should be able to hear the chord. Remove the chord bar and cut a narrow notch where the first line is, as shown in the photo below left. I always put the chord bar back in place and test it after the first cut to make certain things are lining up, and that I haven't cut it too narrow or too wide (too wide will allow the next string over to sound and is harder to fix). You'll gradually accumulate a little pile of felt triangles. Keep a few handy, in case you cut a notch the wrong place, or cut a notch that's too wide and you need to glue a little felt in to fix your mistake. (I do this all the time, so don't feel bad.)
Eventually you'll have the whole chord bar cut (above right). Testing and Inserting the New Chord Bars To test each chord bar, put the new chord bar back on the autoharp temporarily. Then hold it down and pick each string to make certain the new chord bar is playing or dampening the correct strings. To test each chord bar, put the new chord bar back on the autoharp temporarily. Then hold it down and pick each string to make certain the new chord bar is playing or dampening the correct strings.
Repeat these steps for all of the new chords you're installing. As you put each chord bar into its new position, be certain that the bar is going the right direction (remember, on OS chord bars, there's a slot on one end and a hole on the other). Finally, make certain each button is sitting in the slot on the correct chord bar. And that it will be in the right "row" when the chord bar cover goes back on. Closing Up ShopOnce you have all your chord bars and buttons where you expect them to go, test every button to make certain it is playing the chord you think it is. Also, this helps you make certain all of the springs are in place and that your new chord bars are doing the job they're designed for.
Test every chord again. And retune. And play to your heart's content. ConclusionOf course this is only one way to make your 21-chord autoharp more useful for Folk, Bluegrass, Country, or Celtic music. We've documented several more as we get more approaches, of course, but this is the best one for many folks.
In the meantime, please contact us with any questions at all - reader questions are the main thing that drivers our research, so we're always happy to hear from you. Best of luck!
And please stay in touch! - Paul Race
|
|
All material, illustrations, and content of this web site is copyrighted ? 2001, 2002, 2003, 2004, 2005, 2006, 2007, 2008, 2009,
Note: Creek Don't Rise (tm) is Paul Race's name for his resources supporting the history and music of the North American Heartland as well as additional kinds of acoustic and traditional music. For questions, comments, suggestions, trouble reports, etc. about this page or this site, please contact us.
| |||||||||||||||||||||||||||||||||||||||||||||||||||||||||||||||||||||||||


 you're reconfiguring, glue this in place, then notch where needed. Some felt strips come with 'stickum' on the back. I still use glue. Click for bigger photo.")


